SBC-3.5-PX30 (D23)
This page contains the instructions to flash the eMMC/internal SSD on a SBC-3.5-PX30 (D23) SECO board.
Hardware Requirements
-
USB Recovery Cable (CV-1361): custom cable that connects the CN7 connector (USB Recovery) of the SBC-3.5-PX30 and end with a male USB type-A plug.
-
Linux or Windows Host PC.
Linux OS
Download the necessary software from the following links:
-
Rockchip Upgrade_tool: this guide uses the official Rockchip
Upgrade_toolpackage. Here you can find more info about Rockchip flashing tools, while in this github page you can find more useful info about theUpgrade_toolusage from a third party contributor. -
Rockchip PX30 Loader: official Rockchip
loaderfor PX30. -
The OS image file for SBC-3.5-PX30 (D23) (in
.wicformat), e.g. the pre-compiled one provided in the Clea OS Release page.
Instructions for an empty device
These are the instructions to be followed in case the device that needs to be flashed does not either have a bootloader:
-
Connect USB Recovery Cable (CV-1361) to the CN7 connector on SBC-3.5-PX30, and the Host PC on the other end.
-
Power-On the board and check that the device is detected via
lsusbcommand. Something like this should appear, with a reference to “Rockchip”:
$ lsusb | grep Rockchip
Bus 003 Device 011: ID 2207:330d Fuzhou Rockchip Electronics Company
In alternative, you can use the upgrade_tool command to list the compatible devices:
$ sudo ./upgrade_tool ld
List of rockusb connected(1)
DevNo=1 Vid=0x2207,Pid=0x330c,LocationID=7143 Mode=Maskrom SerialNo=
-
Open in the terminal your preferred serial port communication tool (e.g. minicom or gtkterm).
-
Flash the loader on the SBC-3.5-PX30 device via the following command:
$ sudo ./upgrade_tool UL px30_loader_v1.11.115.bin
- If you have downloaded the full image file from the Clea OS release page, it may be compressed into a
.bz2archive, in which case you will need to extract the image, e.g. by running the command
$ bunzip2 <image-file>.wic.bz2
- Flash the
.wicimage in the board via the following command. Remember to substitute the<image-file>.wicwith the file name of the image (e.gseco_px30_d23_clea-os-embedded-full-image-wayland_5-10-x_kirkstone_1-02-00_20240202.wic):
$ sudo ./upgrade_tool WL 0 <image-file>.wic
- Now is it possible to restart the board running the new image.
Instructions for a device already flashed
These are the instruction to be followed in case the device that needs to be flashed has already a bootloader installed:
-
Connect the host machine USB port type-A with Debug UART connector (CN27) on the board over USB-to-TTL Serial cable.
-
Open in the terminal your preferred serial port communication program (e.g. minicom or gtkterm) and configure the serial port as per the parameters below:
port:         dev/ttyUSB0
baud rate:    115200
data bits:    8
stop bit:     1
parity:       none
flow control: none
-
Power on the board and stop boot process within boot delay (5 seconds), using combination of the keys Ctrl+C.
-
in U-Boot shell write command:
> mmc erase 0x4000 0x2000
Starting from Clea OS version kirkstone_1-03-00 the command became:
> mmc erase 0x4000 0x4000
-
This command will erase U-Boot from eMMC. The board will enter into Rockusb mode on the next power on.
-
Repeat the instructions in the previous section to flash the bootloader and image.
Windows
The instructions below are based on the Rockchip guide available at this link, so please consult it for further details on how to flash PX30 CPU-based boards in a Windows environment.
Software Requirements
Download the necessary software from the following links:
-
Rockchip Driver Assistant: Rockchip tool that helps install the driver on your Windows PC.
-
RKDevTool: Rockchip flashing tool for Windows.
-
Rockchip PX30 loader: official Rockchip
loaderfor PX30. -
The OS image file for SBC-3.5-PX30 (D23) (in
.wicformat), e.g. the pre-compiled one provided in the Clea OS Release page.
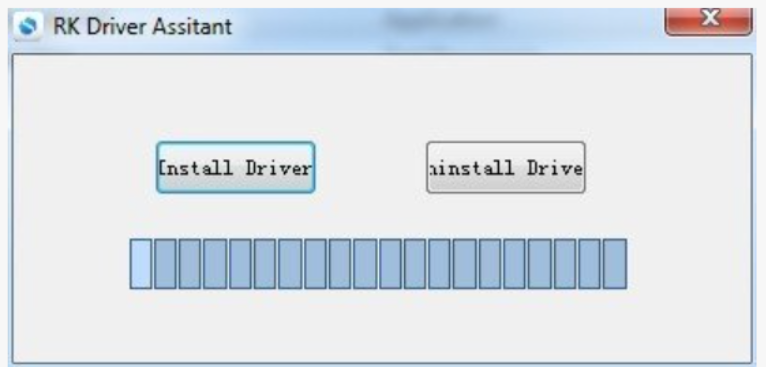
Driver Installation
First, use the Rockchip driver assistant tool to install the driver. There's no need to connect your Rockchip device during this procedure, just download and extract RKDriverAssistant.zip compressed archive. Then, double click on DriverInstall.exe in the RKDriverAssistant directory to start the utility.
If you installed the Rockchip USB drivers for any other Rockchip devices already, make sure you click Uninstall Driver first.
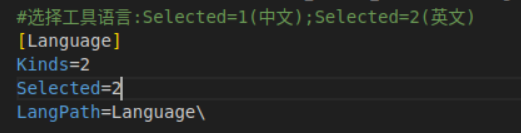
Change language
Once the drivers are installed, RKDevTool tool can be unpacked. However, before running the tool, the config file must be modified by changing the Selected field under the [Language] section to 2 in order to select English language (otherwise, the default one is Chinese).
Instructions for an empty device
These are the instructions to be followed in case the device that needs to be flashed does not either have a bootloader:
-
Connect USB Recovery Cable (CV-1361) to the CN7 connector on SBC-3.5-PX30, and the Host PC on the other end.
-
Power-On the board and check that the device is detected.
-
Open in the terminal your preferred serial port communication tool (e.g. teraterm).
-
Run
RKDevTooland load the PX30 loader file, e.g.px30_loader_v1.11.115.bin, into theLoaderfield and<image-file>.wicinto theImagefield (see image below).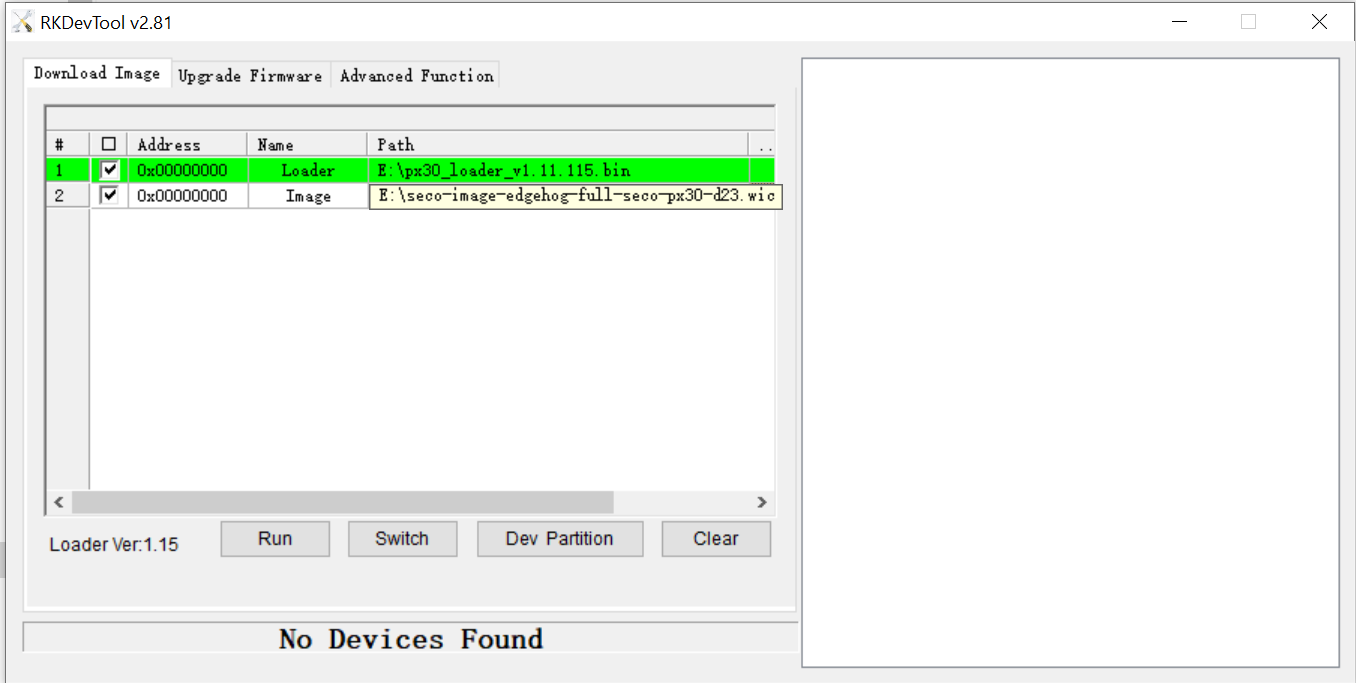
-
Press
Runand wait for the flashing procedure to finish. -
Now is it possible to restart the board running the new image.
Instructions for a device already flashed
These are the instruction to be followed in case the device that needs to be flashed has already a bootloader installed:
-
Connect the host machine USB port type-A with Debug UART connector (CN27) on the board over USB-to-TTL Serial cable.
-
Open in the terminal your preferred serial port communication program (e.g. teraterm).
-
Power on the board and stop boot process within boot delay (5 seconds), using combination of the keys Ctrl+C.
-
in U-Boot shell write command:
> mmc erase 0x4000 0x2000
Starting from Clea OS version kirkstone_1-03-00 the command became:
> mmc erase 0x4000 0x4000
-
This command will erase U-Boot from eMMC. The board will enter into Rockusb mode on the next power on.
-
Repeat the instructions in the previous section to flash the bootloader and image.